Using a custom domain name with your Educator Pages website
A domain name is a custom website address like educatorpages.com or example.com, and we support the use of custom domain names with Educator Pages websites.
Custom domain names is a new feature in Educator Pages Premium. For a limited time we are providing it free for all of our users!
Using a custom domain name with your Educator Pages website is easy, but it involves a few technical steps. Fortunately we've gone through this process hundreds of times and can help you navigate through it.
There are three basic steps in the process:
- Register a domain name. The process of searching for, and "buying", an available domain name.
- Configure your domain name. After registering your domain name, you'll need to connect it to your Educator Pages website.
- Configure your Educator Pages website. After the above steps are complete, you'll need to make one small change in your Educator Pages account to support your new domain name.
About Domain Names
The cost to register a domain name is roughly $10-12 per year, but can be higher or lower depending on your preferences. Domain names must be purchased online from a registrar (a fancy name for a place that sells domain names). You can choose from many different kinds of extensions (called TLDs) like .com, .net, .org, and even .love, .party, and hundreds more!
Domain name registrations expire at the end of their term and can be renewed, either manually or automatically. When registering your domain name, use an email address that you're sure to have in a few years' time (not a school email address)!
You can purchase a domain name now and use it when you're ready, or follow our instructions below to connect it directly to your Educator Pages website.
Enough Talk, Let's Get Started!
First, Register a Domain Name
- Visit NameCheap.com (our recommendation, link opens in a new window) and search for a domain name.
- When you find one you like, click the button to add it to your cart.
- Click the View Cart button, chooose how many years you'd like to register the domain name for (we recommend at least 2), and continue to confirm your order (we recommend including the optional WhoisGuard service, but not any others like PremiumDNS.)
- Continue to enter your personal and payment details, and complete the check out process, just like any other online store.
Congratulations! You've just purchased your own personal domain name! At this point you may receive an email from NameCheap.com, and you may need to click a link in it to confirm your domain name.
Next, Configure the Domain Name
This is the most technical part of the process, but we've outlined the steps below:
- Optional: If you'd like to refer to NameCheap.com's instructions you can find them here, but use the settings we've listed below in steps 6-10.
- From your NameCheap.com account Dashboard, click Domain List.
- Click the Manage button for your domain name.
- Click the Advanced DNS tab near the top of the screen.
- Click the Add New Record button, right below the first Host Records section.
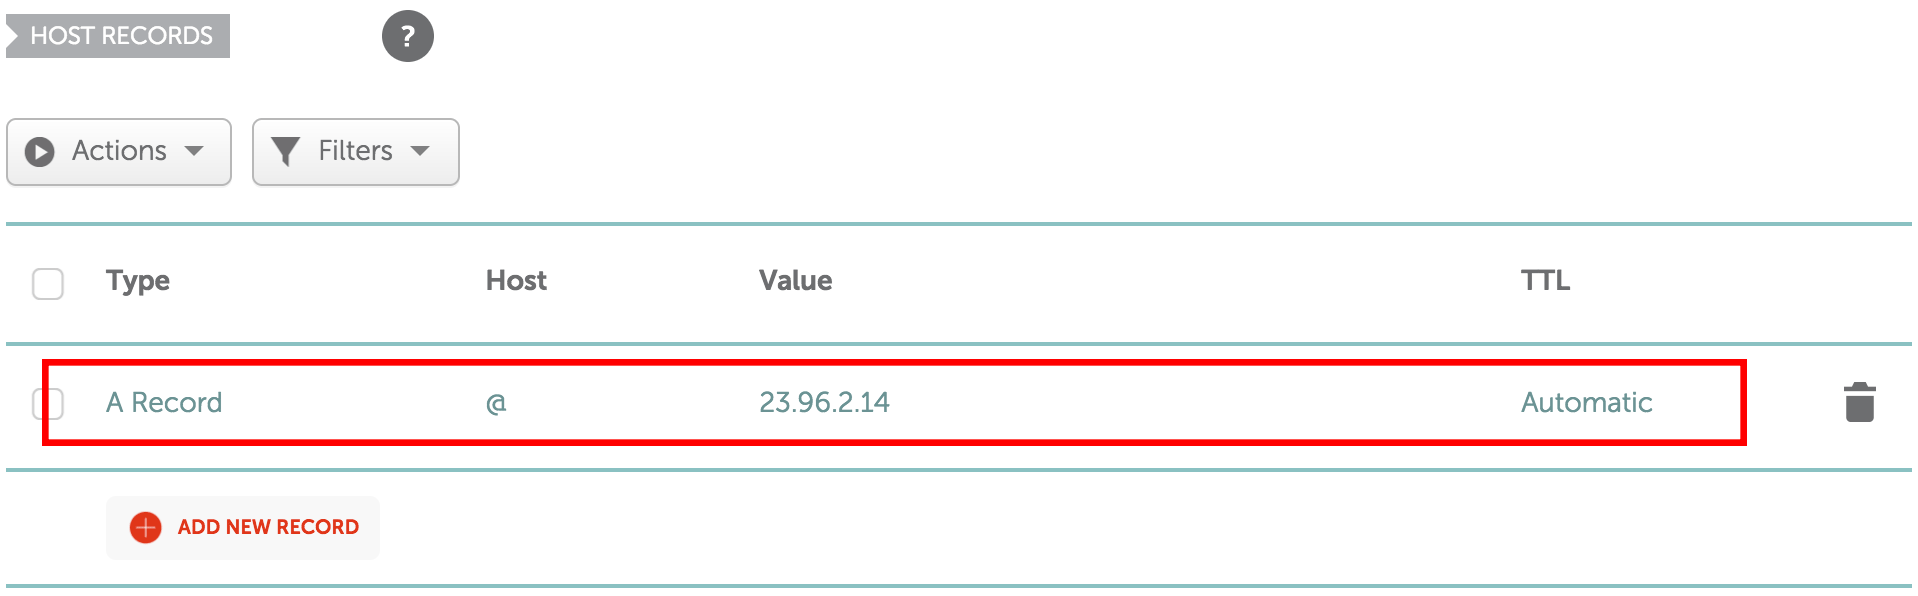
- When the new record type dropdown appears, select A Record from the list.
- For Host, enter this exactly:
@
- For Value (or IP Address), enter this exactly:
23.96.2.14
- For TTL, leave the default value Automatic selected.
- Click the small green checkmark to confirm your changes.
- Lastly, delete the existing URL Redirect and CNAME records using the delete button, and if there is one, click the Save All Changes button (if there's no button, don't worry!) You should be left with just one setting in this section.
Hooray! You've just completed the hardest part. Your settings should look just like the image below. If not, adjust until they match and be sure to save your changes. One more step to go, and the last one is super easy!
Lastly, Configure Your Educator Pages Website
In this last step, you just need to tell us what your domain name is. When you're ready, visit the Domain Name Settings page, enter your exact domain name (in the format example.com) and click the Save Changes button.
Patience may be required: Domain name additions or changes usually happen almost immediately, but can take up to 24 hours to fully complete. If you're sure you've completed the instructions correctly but you aren't seeing your website right away when browsing to your domain name, you may need to wait a few hours and check again.
That's it! You're all done. When you visit your new domain name in a browser, you should be redirected to your site.